|
Choose log files |


|
|
Choose log files |
|
Web Log Storming is project based software. It uses its own file format (.WLS) that defines essentials like log file locations, basic configuration and global filters.
To quickly analyze your log raw files without any pre-configuration, simply drag them from the Windows Explorer to the Web Log Storming main window. However, although convenient, this method is not suitable for more serious log analysis.
Step 0: Locate raw log files
Web Log Storming doesn't require you to embed any code into web pages. Instead, it uses raw log files to create stats and you'll need to locate them before using Web Log Storming. Log files are originally located on your web server and you can usually download them using FTP. Please contact your hosting provider for further instructions.
Once you locate them, you can retrieve them manually with any FTP client, or you can configure Web Log Storming to do this automatically.
Step 1: Create a new Web Log Storming project
| □ | Select File | New from the main menu |
| □ | Select New project file icon from the toolbar |
| □ | Use Start New Project from the Home screen |
You should see the Project Properties window.
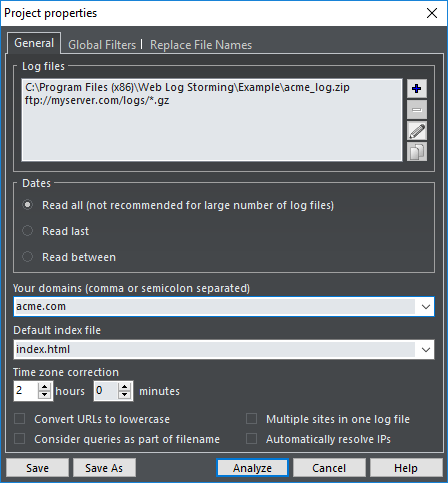
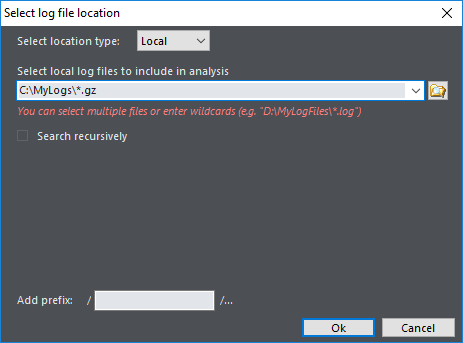
Step 2: Choose log file locations
You can choose one or more log file sets (locations). Logs will be combined - they don't need to originate from the same website and they can be even written in different formats. You can distinguish statistics from different websites by entering a prefix that will be added to file requests. Wildcards and archive types are also allowed.
Three types of log file locations are supported: Local, FTP and HTTP. If you select either FTP or HTTP types, only changed files will be automatically downloaded before the analysis.
Examples:
C:\Log Files\*.log
C:\Log Files\2004*.zip
ftp://myserver.com/logs/*.gz
See also: Log File Location editor
Step 3: Set other options
Dates
Limit dates that you want to examine. Web Log Storming remembers which dates are contained in specific log files, so it doesn't need to re-read all of the log files every analysis.
Read all
All selected log files are read and analyzed. Depending on size of log files, this could be time-consuming and it's not recommended.
Read last
Reads last X days only. This option is recommended for regular analysis.
Read between
Define exact start and end date to read and analyze. Use it when you want to analyze a specific time period.
Your domains
Domains added here (separated by comma or semicolon) will be excluded from referrer reports.
Examples:
mydomain.net
acme.com, otheracme.com
Default index file
All web servers send a default page when a visitor accesses a directory without a filename. For example, if visitor points his browser to http://www.myserver.com/, depending on configuration, the server will actually send a http://www.myserver.com/index.html page. In this case, enter index.html here and all .../ request will be replaced with .../index.html in the reports.
Examples:
index.html
index.htm
index.php
default.asp
Time zone correction
If your web server doesn't log time for your time zone, you can enter the time difference here.
Other options and Global filters
Please view the Project Properties page for descriptions and other options.
Step 4: Analyze
When you are finished with these settings, click the Analyze or Save buttons.
See also